


Automate DNS, Hosts, and Docker with Ansible Playbook
- Max Bright

- Dec 9, 2023
- 3 min read

Greetings, DevOps and automation tech enthusiasts!
In our previous article, we explored the fundamentals of Ansible playbook and its role in efficient configuration management. Today, we take another leap forward by diving into the world of host network services and Docker network configuration, as well as Windows DNS/IPAM registry services. By leveraging Ansible's automation capabilities, we'll learn how to define and automate DNS and IPAM registries within a Windows server, as well as configure the Ethernet interfaces of the hosts contained in the "inventory" file, along with defining Docker networks with the driver ipvlan options.
Step 1: Defining Host Network Services and DNS Configuration
To streamline the management of host network services, we'll employ Ansible's powerful modules. Picking up from where we left off in the previous article, we've added the "dns" role with tasks "Create type A record" and "Create type PTR record," which leverage the "win_dns_record" module and authentication to Windows using "winrm" and "credssp" transport options. For more information regarding Windows authentication winrm, refer to Ansible docs.

Additionally, we've integrated host network configuration into the "base" role by adding tasks to apply static network settings according to the values defined in the "inventory" file. Also, the tag definitions make it easy to run the playbook and effect only those select task modules, in case one-off scenarios arise when we only want to run those tasks and not the entire project. If we combine that with the --limit option at run time, we can really get granular with our deployments!
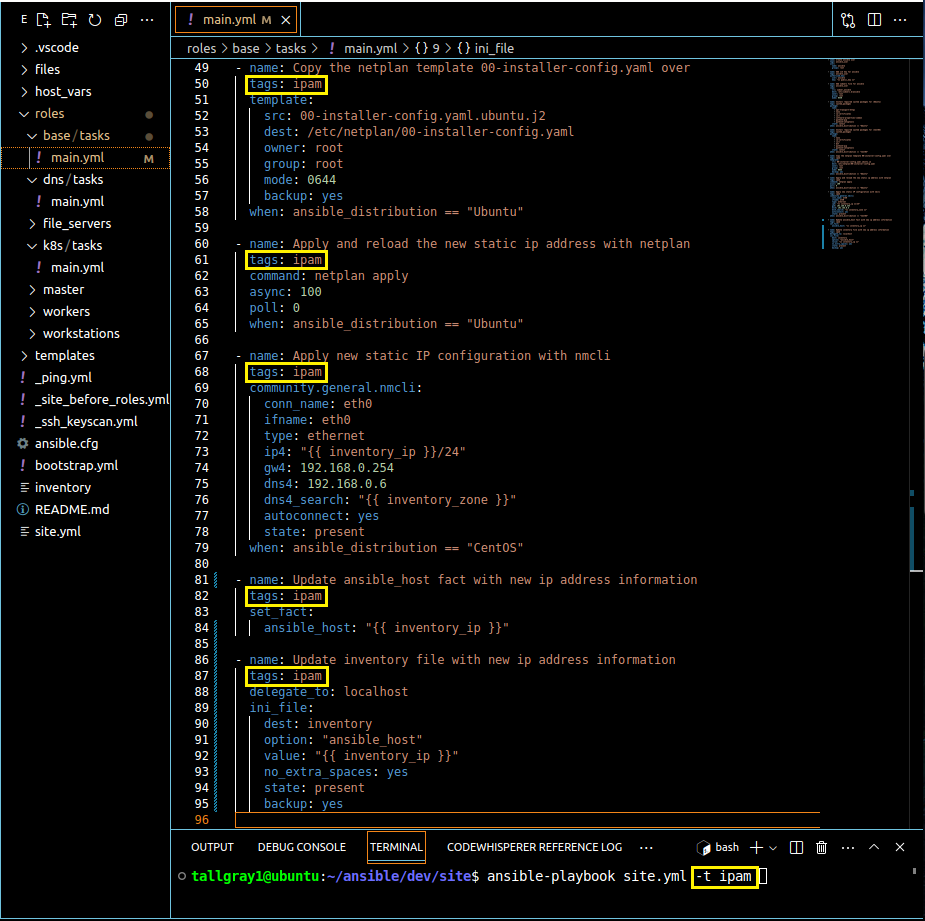
Storing the DNS and IPAM details for hosts defined in the Ansible "inventory" file, enables seamless configuration management by keeping the pertinent attributes in a consolidated, easy to manage location.

Step 2: Automating Docker Network Configuration
In the realm of containerization, Docker networks play a vital role in enabling seamless communication between containers and the external network. We can see how Ansible simplifies Docker network configuration, specifically utilizing the "docker_network" module.

The snapshot above demonstrates how the "docker_network" module applied the driver "ipvlan," with an IP address range, to allow for container instances to have their own IP address assignment and their traffic routed on the external network, just like any other network attached host. Keep this in mind, because we will circle back to this in a future article, where we'll delve into Docker image design and micro-service container deployment.
Step 3: Centralizing Host Naming and IP Assignment
To maintain streamlined administration and management, it's crucial to centralize host naming, IP address assignment, and zone allocation. Scroll back up and take another look at snapshots 2 and 3. If you recall from the previous article, when we defined the "inventory" file, we only set the DNS hostname under each [group] category. Notice how by expanding the variable key-value pairs in the "inventory" file we were able to correct asynchronous IP occurrences between the DNS, IPAM registery of our Windows server and the actual host network configuration. Also notice that the logical task sequencing made changes to the target host, then the Ansible facts and .ini reference file using the modules "set_fact" and "ini_file" respectively. The final result, we automatically clean up the host inventory file so target hosts, inventory definitions and IPAM registry all stay in-sync. It's also worth mentioning that, by organizing this information in a single file location, we simplify administration and make correlation of data more manageable. If you happen to be responsible for Site Reliability Engineering, you may recognize how practices like this really add value. In all, this set up allows for easy manipulation and correction of host IP configurations, ensuring optimal connectivity and DNS/IPAM resolution throughout the site.
That's it for this edition! As always though, we'll continue to provide clear explanations, practical examples, and useful screenshots to guide you through each step. The aim is to equip you with the skills and knowledge needed to navigate complex concepts effortlessly.
Remember, you can clone this repository (git clone git@github.com:tallgray/ansible.git). As always, your feedback and engagement are invaluable, so like, comment, repost, or send this article to a friend or colleague. Until next time, keep revolutionizing how we manage configuration!

Comments